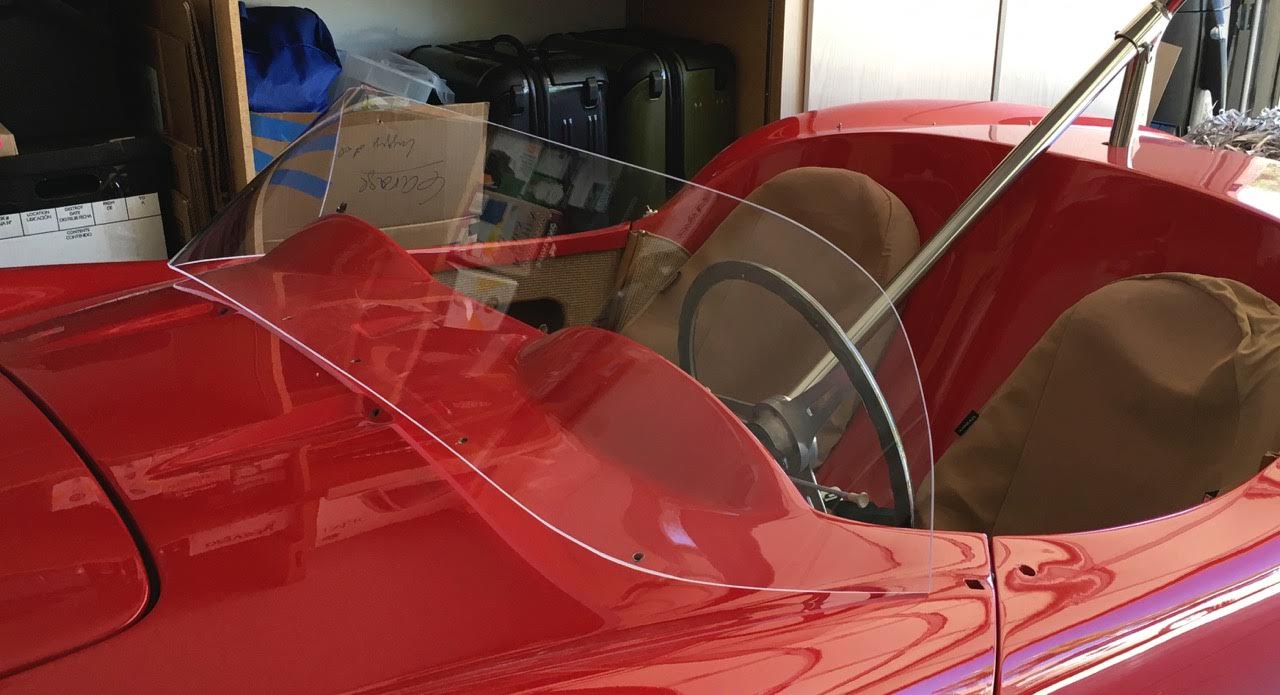
New Windshields Now Available for your Devin C, D, & SS
By Brian Miller
I'm very excited to post this article and Brian has done a great job with it. I get so many people asking me where to find a windshield for these cars and now I have an answer. Brian's Devin C looks fantastic with the speedster style windscreen. Brian and a mutual friend John Priddy also run a Devin C registry, if you're interested in the Corvair powered cars send him an email. -Kreg
Part 1: Recreating the original
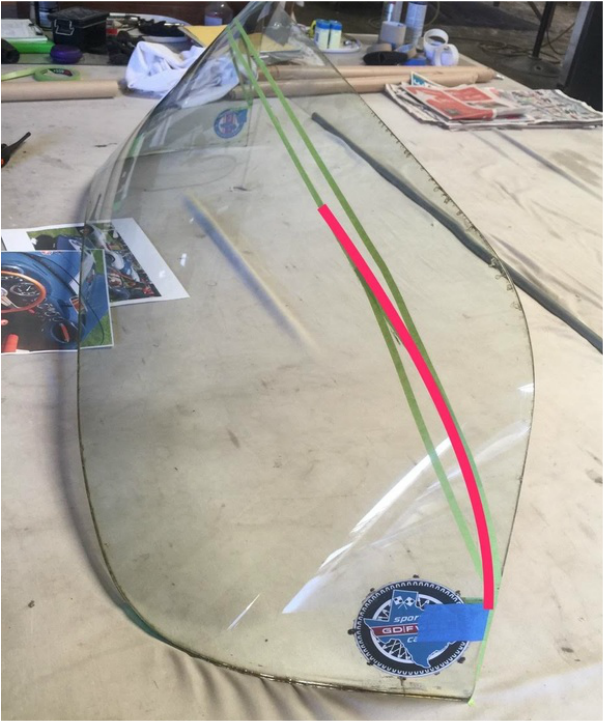
I offered up my 55 year old glass windshield as sacrifice to the automotive gods that we all may have new windshields today and in the future. That sounds like a noble act but truth be told my original glass had decades worth of chips, pits and delaminating edges and needed replacing. The glass also included a sizable crack carefully hidden by a previous owner under a Texas Sports Car Club decal in what I can only assume was a duplicitous effort to pass tech inspection during his days as a racer. When I handed my original glass windshield over to Aircraft Windshield Company I knew it might not survive the mold making process, and I did it anyway.
I contacted over a dozen reputable speed shops from coast to coast to build a cut-down speedster style windshield for my Devin C and all of them told me the same thing, call Aircraft Windshield Company. You’ve probably never heard of Aircraft Windshield Company but you have seen their work on Le Mans winning race cars, auto-show prototypes, and even the Batmobile. Not to mention the canopies they manufacture for various aircraft. Aircraft Windshield Company’s die hard customers are vintage racers who often need windscreens made in a variety of shapes and sizes. If you ask around the paddock you’ll only hear praise for their windshields. I called them, explained my project to them, and made an appointment to visit their shop in California.
Aircraft Windshield Company offers a variety of materials and finishes for custom windshields. Based upon the extreme curvature of the original Devin glass they suggested acrylic as having outstanding optical clarity when formed to tight curves. They also offer a variety of material thicknesses. I chose 1/4 in. as it approximates the thickness of the original glass (if you are thinking about racing your Devin be sure to check the rulebook for your class for minimum required thickness). Aircraft Windshield Company also offers a variety of tints but I chose no tint, again, to be as close as possible to the original glass. The last decision to make was how low I wanted my speedster style windscreen to be. I worked with the craftspeople at Aircraft Windshield Company until the height and shape were to my liking.
After all our discussions and decision making I commissioned them develop two styles of prototype windshields for the Devin, one full sized exact duplicate of my original glass windshield and one cut-down speedster style screen. It took less than 30 minutes to work out the details and half of that time was spent by me walking around their workshop looking at all the cool fighter jet canopies and race car bits on the shelves. They told me it would take about 2 weeks to make & perfect the mold, create a test windshield, and then make the two prototypes for me to test (You can read more about my windshield installation and driving experiences starting with PART 2 below).
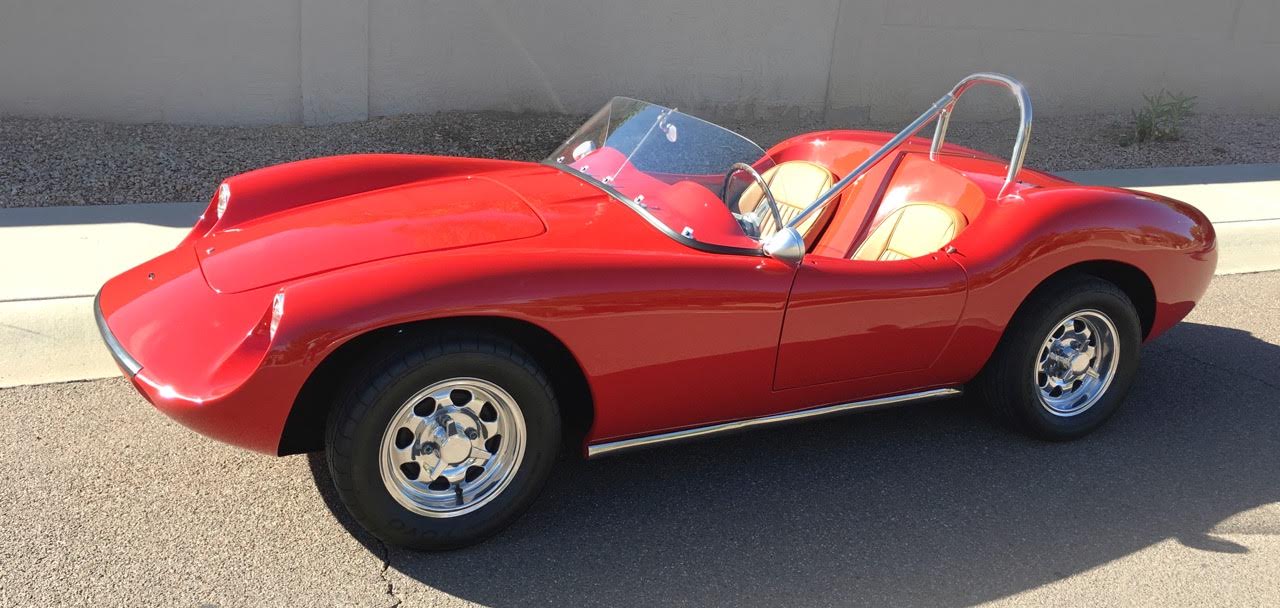
Sadly, my original glass did break when being released from the mold making process but I do not think Aircraft Windshield Company should be faulted for this. The glass was old and already cracked. I’m not upset that it broke because now they have a perfect mold and can make new windshields for all Devin owners. The mold is an exact duplicate of the original Devin glass as fitted to the Devin SS, Devin D, and Devin C models. You should be able to use it as a direct replacement using the original Devin windshield frame and mounting hardware. They can also provide you with the cut-down speedster style windshield featured here.
Sadly, my original glass did break when being released from the mold making process but I do not think Aircraft Windshield Company should be faulted for this. The glass was old and already cracked. I’m not upset that it broke because now they have a perfect mold and can make new windshields for all Devin owners. The mold is an exact duplicate of the original Devin glass as fitted to the Devin SS, Devin D, and Devin C models. You should be able to use it as a direct replacement using the original Devin windshield frame and mounting hardware. They can also provide you with the cut-down speedster style windshield featured here.
Additionally, Aircraft Windshield Company can work with you to provide a cut-down windshield to your own specifications for road or track. Since you need to choose the height, thickness, and finish, Aircraft Windshield Company requests Devin owners contact them for a custom price quote. I found their prices to be very reasonable. We invested a lot of time and effort to create the prototypes and now Aircraft Windshield Company is ready to offer these high quality new windshields to all Devin owners.
Aircraft Windshield Company
10871 Kyle Street
Los Alamitos, CA 90720
562.430.8108
www.aircraftwindshield.com
Aircraft Windshield Company
10871 Kyle Street
Los Alamitos, CA 90720
562.430.8108
www.aircraftwindshield.com
PART 2: Choosing a mounting method for the speedster style screen.
FRONT MOUNTING STRIP: A metal strip bent to conform to the body of the car. This strip is attached to the body and the windshield is attached to the mounting strip. The strip can be finished in bare metal or painted to match the car and provides a secure mounting. Several of the Devin race cars in period used this mounting method and it can clearly be seen in photos of the Devin D prototype as well. A modern bonus to this method is the option to use well nuts to attach the windshield, simplifying installation while reducing the potential for cracking or scratching. The downside to this method is unless you have metalworking experience, this would not be a typical weekend project.
SIDE MOUNTING POSTS: Several race and production cars used this method including the Porsche Speedster and the Devin. I’m guessing Bill Devin was a fan of the Porsche Speedster as his windshield mounting system is very similar in that it uses a frame across the top of the glass attached to posts on either side that secure through the body. Some vintage Ferrari and Porsche racers used modified versions of this mounting technique.
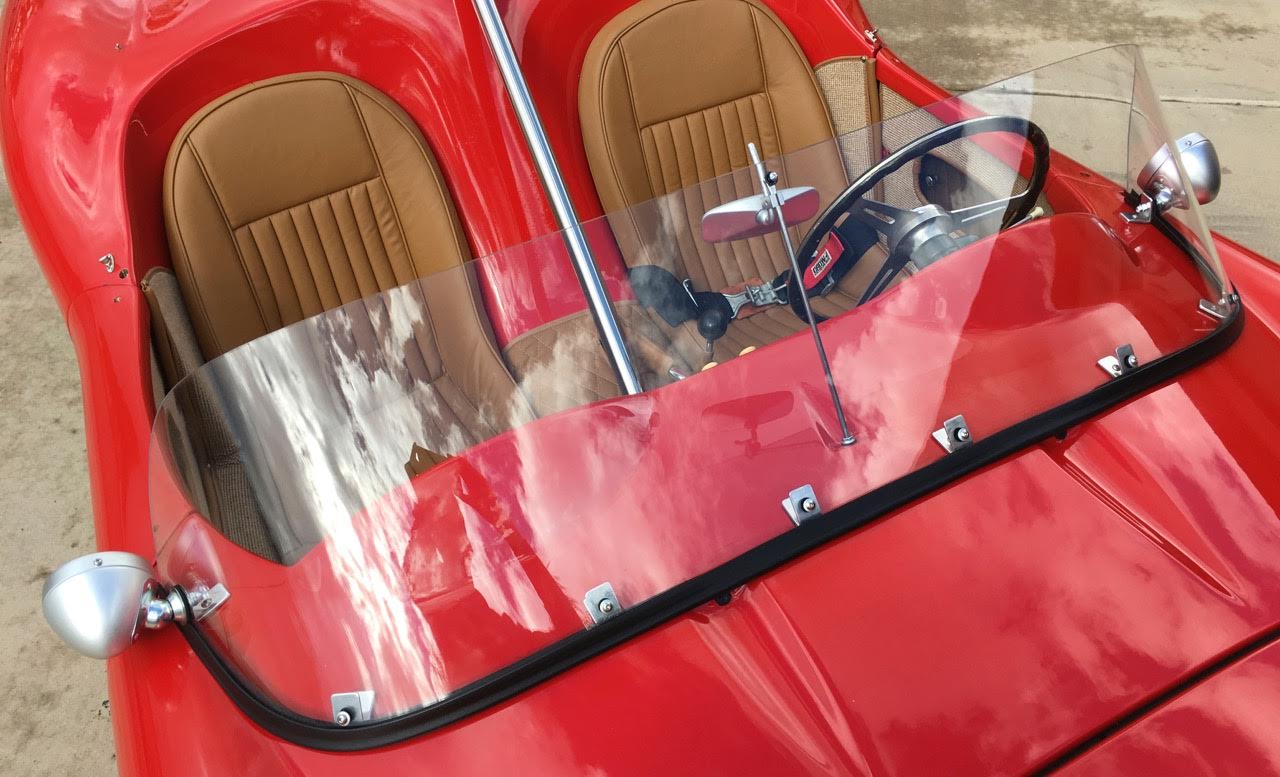
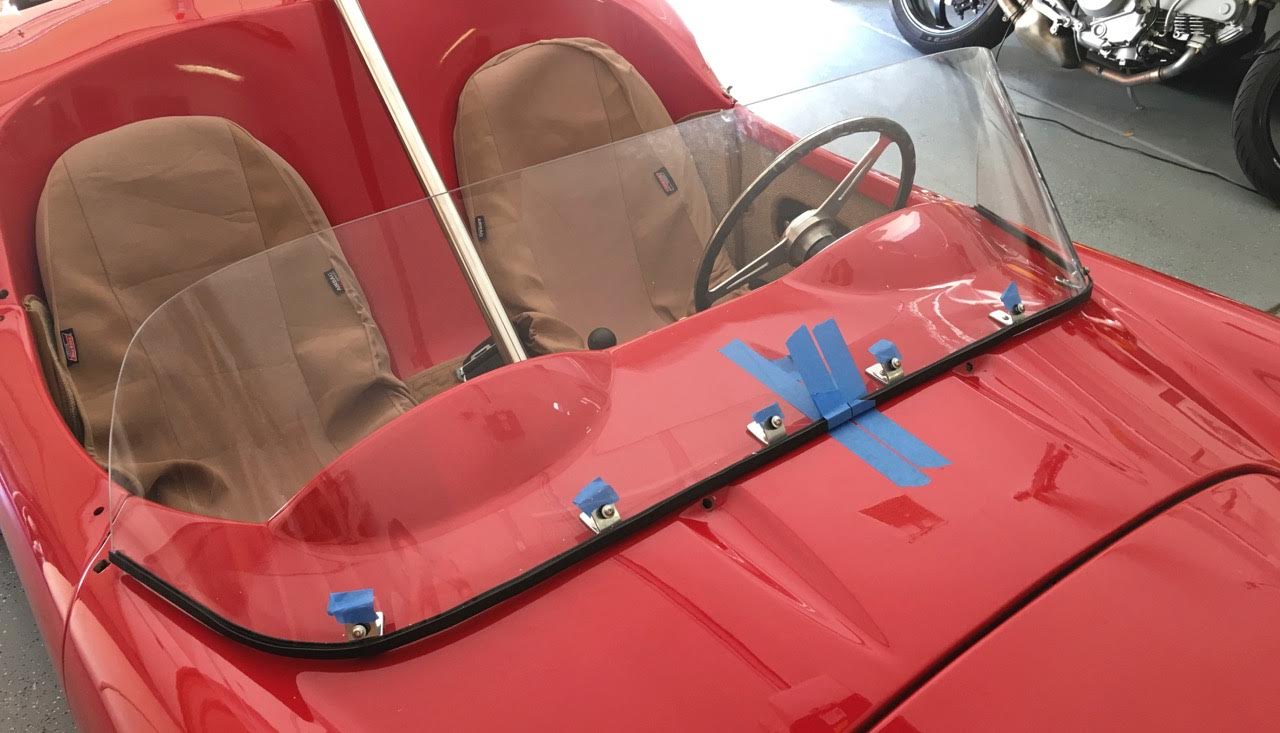
MOUNTING BRACKETS: The majority of Devin race cars I have seen running historic races use this method. Angled brackets are secured to the body and then the windshield is mounted to the brackets. Most applications feature some sort of rubber seal or weatherstrip where the windshield meets the body. Some race cars also use fewer brackets in combination with the SIDE MOUNTING POSTS method mentioned above to good effect.
What method did I choose?
When I first started this project I wanted to use the holes already in the body of my Devin and go with a vintage race look so I chose the Mounting Brackets method. This would allow me to easily revert to the stock size windshield and frame at any time.
What method did I choose?
When I first started this project I wanted to use the holes already in the body of my Devin and go with a vintage race look so I chose the Mounting Brackets method. This would allow me to easily revert to the stock size windshield and frame at any time.
Part 3: Fabricating the brackets
Full disclosure, my father was an aircraft mechanic who rebuilt cars on the side. While I admired him I never had the opportunity to learn more than basic wrenching skills from him so all of this is new to me. This project was my first attempt at creating anything with metal and I made it up as I went along simply trying to match what I had seen in old photos and on race cars. I’m sure anyone with even minimal experience could do this faster and better than me. This is what worked for me, you may find a way that works better for you.
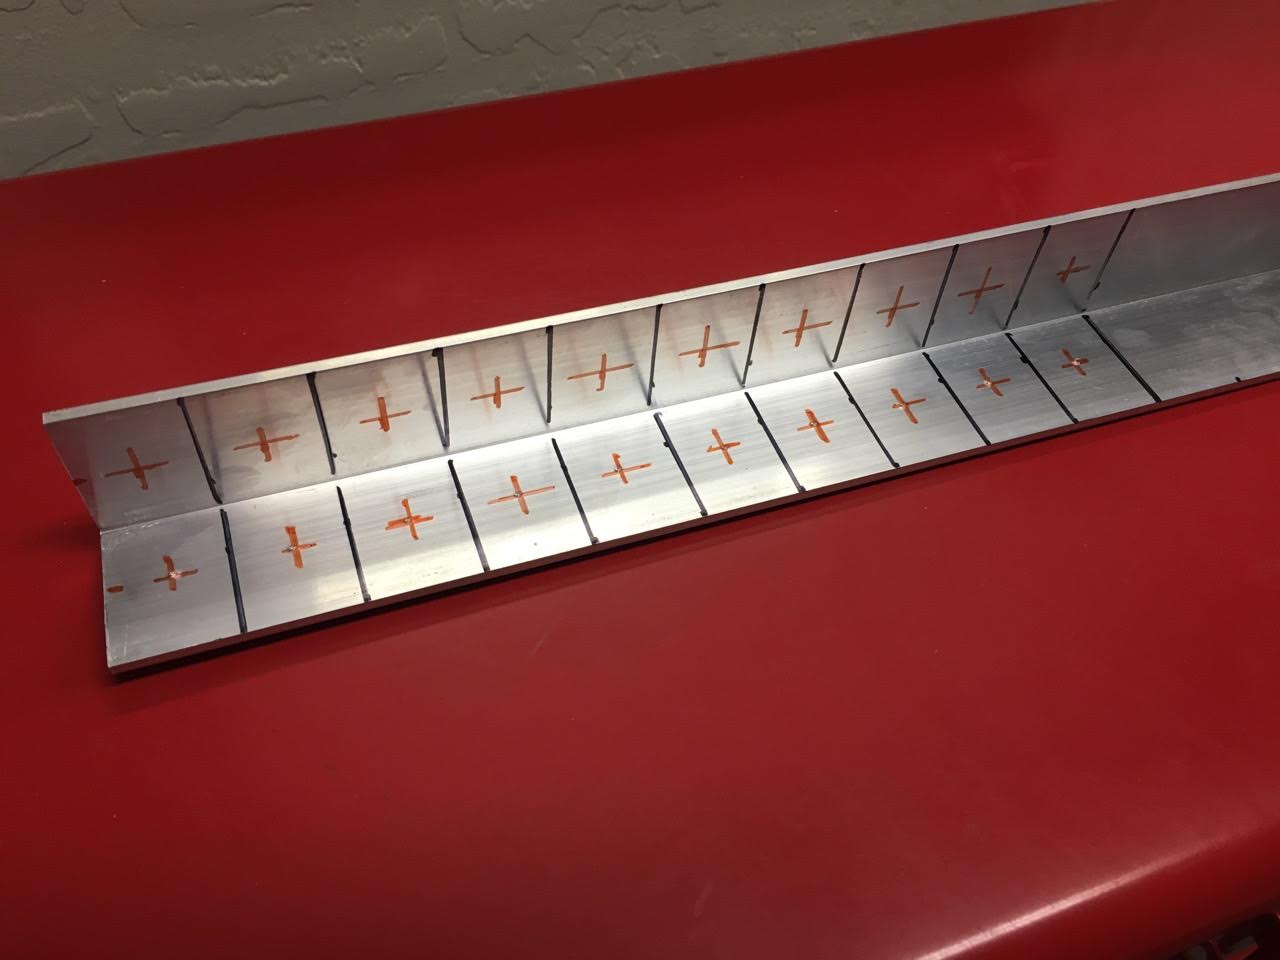
I purchased 1-1/2 in. x 36 in. aluminum angle bar 1/8 in. thick. I decided I wanted my brackets to be 1 in. wide with holes in the center of each side (In retrospect it might have worked better to have the holes be 1/2 in. from the topmost outer edges on the side facing the windshield). I marked out all my measurements for drilling and cutting first. I knew I would need 6-8 brackets and decided to make 10 to allow for spares in case of mistakes.
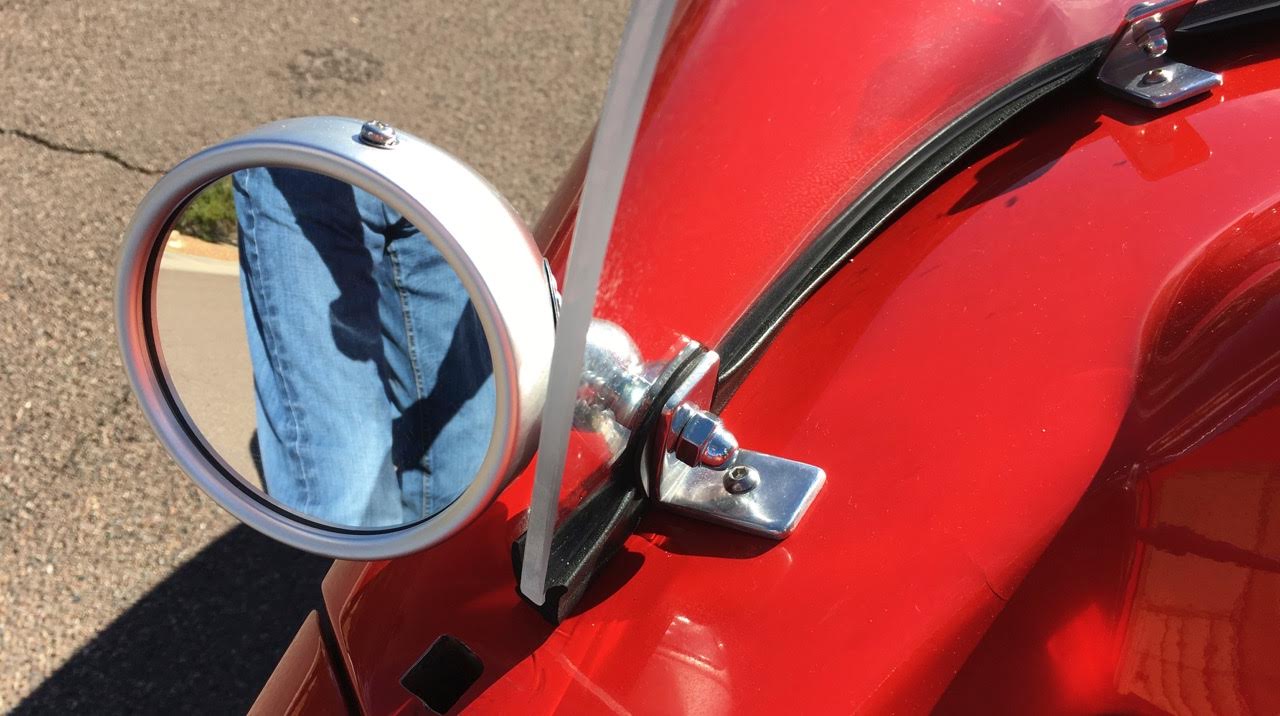
With all my marking is place I drilled all the holes first. I used a 1/4 in. drill bit. If you have a drill press it will make it easier to be precise. If you want to mount side view mirrors to two of the brackets like I did then two of the brackets will need 3/8 in. size holes on the face where the mirror will mount.
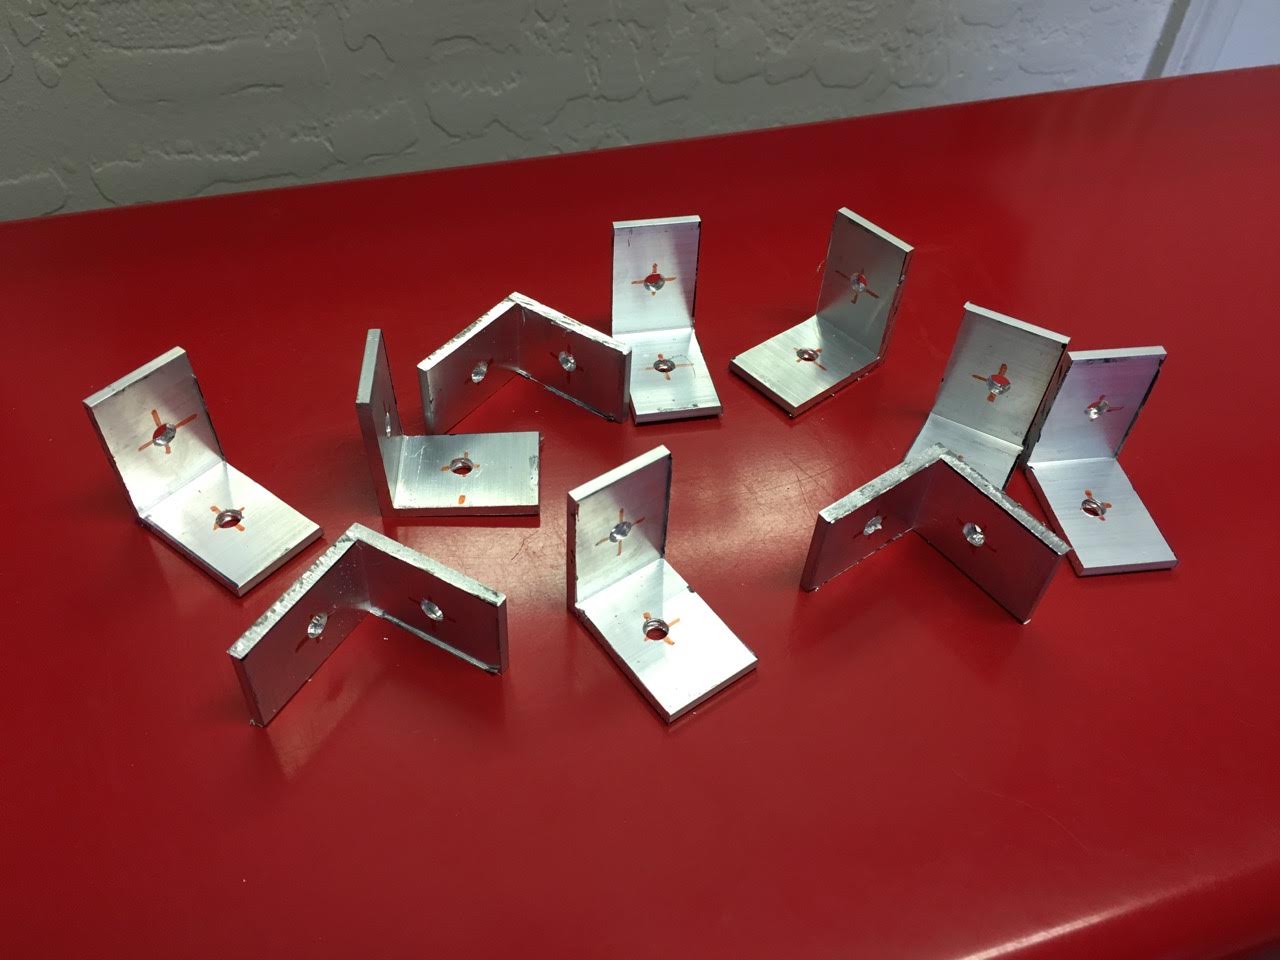
Once all the holes were drilled I used a band saw to cut the brackets from the aluminum stock.
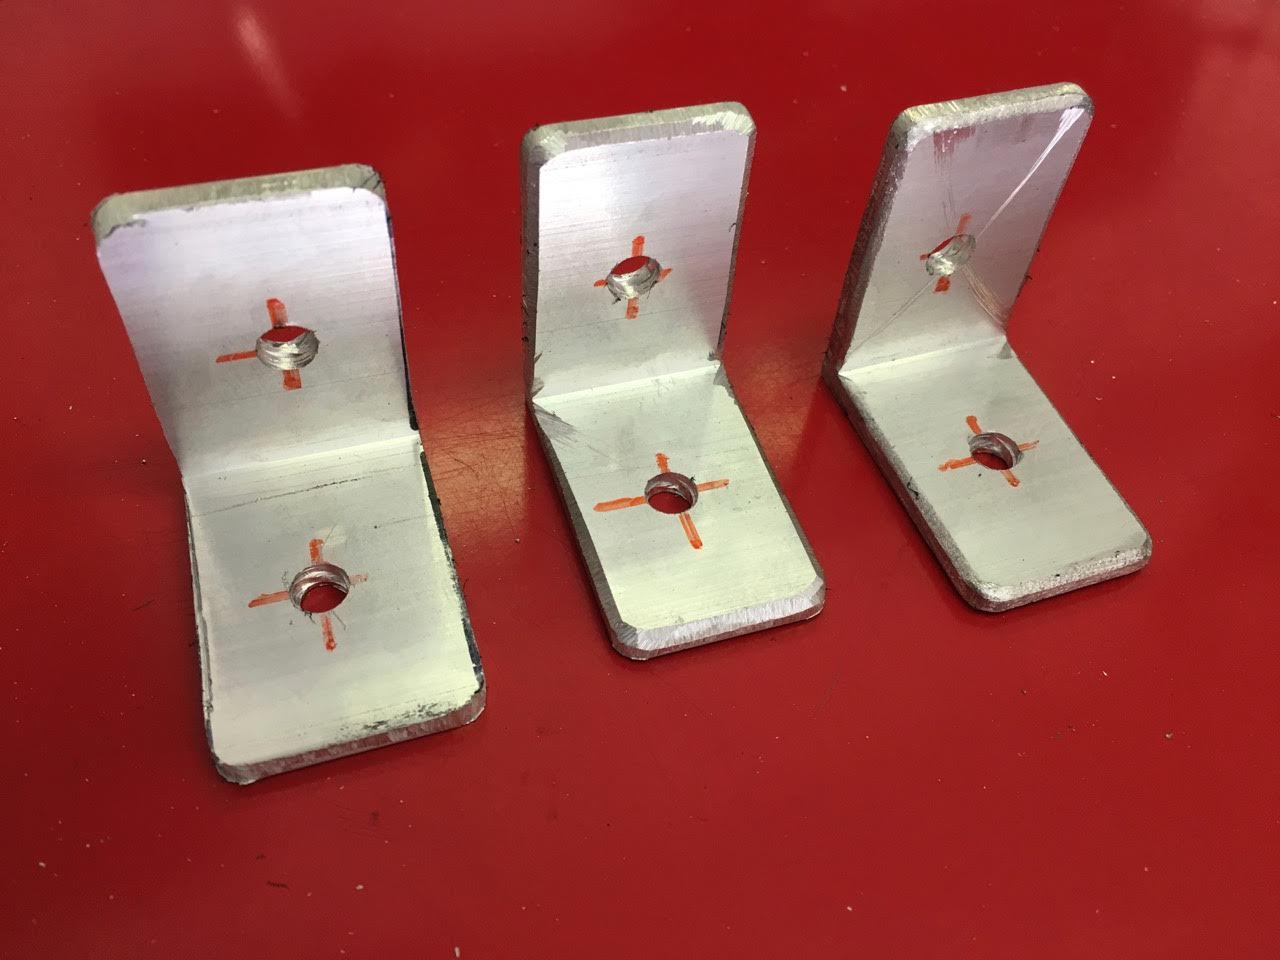
I used a bench grinder to round the square edges of the brackets and grind most of the 90 degree angles away to 45 degree angles. I then used a combination of the aluminum grinding stone bit and the 200 grit sandpaper drum bit in a rotary tool to smooth away all the grinding marks leaving me with much smoother edges.
I wet sanded each bracket using 400, 800, and 1500 grain sandpaper. This resulted in a smooth finish resembling brushed aluminum.
I went back to the bench grinder using the denim wheel to remove most of the visible sanding marks. Next I dabbed some aluminum polish on the brackets and used the buffing wheel to create a mirror like finish.
I went back to the bench grinder using the denim wheel to remove most of the visible sanding marks. Next I dabbed some aluminum polish on the brackets and used the buffing wheel to create a mirror like finish.
From L to R: Sanded with rotary tool, wet sanded by hand, buffed and polished
The last step in creating the brackets was using a bench vise to bend each bracket to the approximate angle required to match up with the new windshield. The aluminum did not require heat to bend in the vise. If you have a hydraulic press or brake you will be able to more accurately control the angle of the bend.
With the mounting brackets finished it was time to start assembling all the pieces.
With the mounting brackets finished it was time to start assembling all the pieces.
Part 4: Assembly
Mounting Hardware - Body
To mount the brackets to the body I used the following:
- 8 Button Head machine screws (hex head) #10-32 x 3/4 in.
- 6 fender washers 1/4 in. x 1-1/4 in.
- 6 #10 flat washers
- 6 #10 lock washer
- 6 #10-32 nylon Lock Nuts (I used #10-32 wing nuts during the test fitting phase and switched to lock nuts for the final install)
- 2 #10-32 Well Nuts (aka Rubber Insulated Brass Rivet Nut)
I chose hex head machine screws so I could use an allen wrench to access the screw heads even with the windshield in place where a screwdriver may not fit. I purchased an inexpensive allen key set and cut approx 1/8 in. off the short end of the 1/8 in. allen wrench. This works even with the extreme angle of the brackets.
I was going to use rubber washers between the body and mounting brackets but in the end I purchased a small sheet of neoprene gasket material and cut small pads with holds in them to fit under each bracket and protect the paint. Insert the machine screw through the top of the bracket into the Devin body. From under the dash add the fender washer, flat washer, lock washer, and nylon lock nut or wing nut. I mounted the brackets finger tight but loose enough they could swivel as needed when attaching the windshield to avoid binding. You can tighten up all the nuts & bolts after you are sure everything fits together perfectly.
For the side mounts I used well nuts with do not require the need for access behind the panel. I did have to drill two small holes into the body of the Devin to accommodate the well nuts.
Drilling the mounting holes in the windshield.
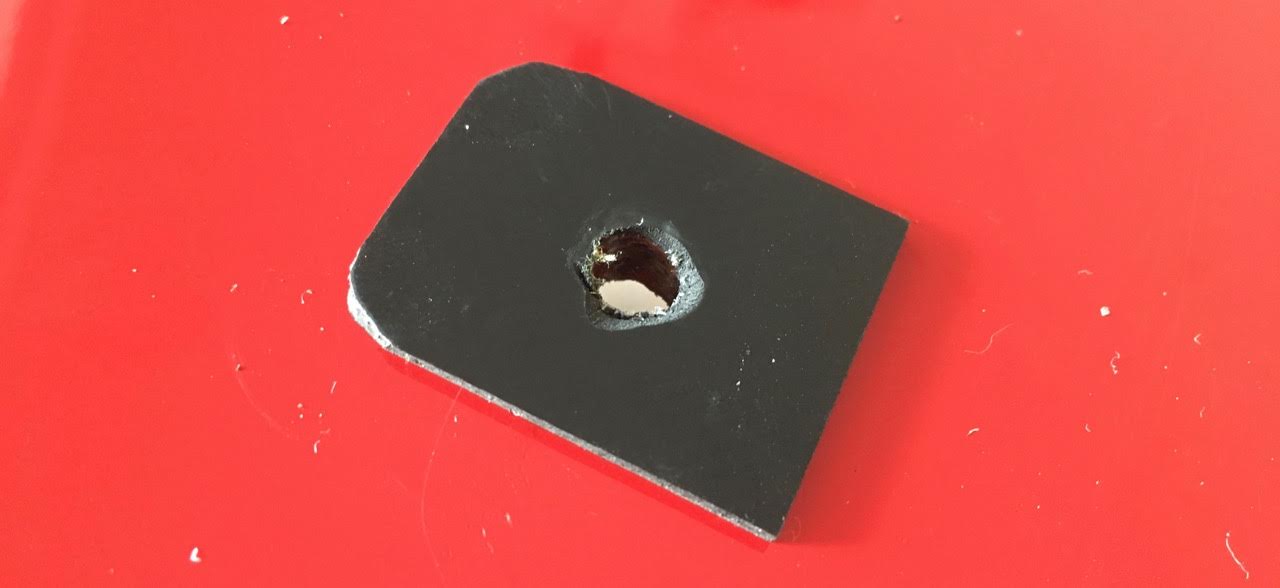
DO NOT ATTEMPT TO DRILL THE ACRYLIC WINDSHIELD WITH STANDARD DRIL BITS!!! You will need to use special drill bits made only for drilling holes into acrylic. I ordered the following drill bits from McMaster-Carr
- Drill Bit for Plastics, 1/8 in Part No. 27465A81
- Drill Bit for Plastics, 3/16 in Part No. 27465A84
- Drill Bit for Plastics, 1/4 in Part No. 27465A83
- Drill Bit for Plastics, 3/8 in Part No. 27465A86 (only needed if you want to add the side view mirrors like I did)
To reduce the risk of stress cracking I recommend all holes be at least 3/4 in. away from any of the windshield edges.
Since I was using the existing holes in the body of my Devin I had to mount the brackets to the car, then set the windshield on the body and use a china marker (grease pencil) to mark on the windshield where to drill (NOTE: If you are not trying to utilize pre-existing holes i the body of your Devin it would be much easier and faster to measure, drill, and mount the brackets to the windshield on the workbench and then mount the entire assembly to the car body).
Use the smallest drill bit to drill pilot holes and then move up to the next size bit, and then the largest bit. If you will be adding the side mirrors use the 3/8 in. bit for those 2 holes.
Adding in the rubber trim.
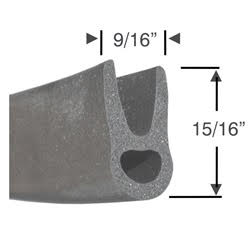
I experimented with three types of rubber trim and weatherstripping. In the end I purchased 10 feet of extruded sponge rubber trim from and trimmed to fit. The trim simply presses on to the base of the windshield with no clamps or glue required. The fit and seal were the best of all the various trim pieces I tried and hid any minor imperfections of fit between the windscreen and the body.
- Steel Rubber Products (Part No. 83-0115-73)
Mounting Hardware - Windscreen
To mount the windshield to the brackets I used the following
- 6 Button Head machine screws (hex head) #10-32 x 3/4 in.
- 6 #10 Bonded Sealing Washers galvanized with neoprene backing
- 6 #10 Rubber Washers 1/4 in x 5/8 in.
- 6 #10 lock washer
- 6 #10-32 cap nuts
Test Fitting
Tighten all the machine screws to finger tight and check the fit. When mounting the windshield to the brackets be sure the windshield is resting evenly across each bracket (I used a business card as a feeler between the windshield and bracket). If the bracket is pushing tightly against the windshield at the top but has a gap at the bottom (or vice versa) then the angle of the bracket needs to be adjusted until the the windshield makes even contact against the face of the bracket. Once your are happy with the fit tighten all machine screws and nuts. Do not over tighten! It is possible to crack the windshield if you over tighten the machine screws and nuts.
Mounting the side mirrors (optional)
I purchased a set of vintage style aluminum racing mirrors form Pegasus Racing (Part no. 5173-300). I used the rotary tool to extend the adjustment slot on each mirror by approximately 1/8 in. - 1/4 in. The mirrors come with a large rubber washer for the side that mounts to the windshield. I used neoprene gasket material to create a pad between the windshield and the mounting bracket I made. I used a 1/4 in. cap nut instead of the plain nut that came with the mirror for a more finished look. The flat mirror glass on the passenger side is replaced with convex mirror glass for greater visibility.
I purchased a set of vintage style aluminum racing mirrors form Pegasus Racing (Part no. 5173-300). I used the rotary tool to extend the adjustment slot on each mirror by approximately 1/8 in. - 1/4 in. The mirrors come with a large rubber washer for the side that mounts to the windshield. I used neoprene gasket material to create a pad between the windshield and the mounting bracket I made. I used a 1/4 in. cap nut instead of the plain nut that came with the mirror for a more finished look. The flat mirror glass on the passenger side is replaced with convex mirror glass for greater visibility.
Fabricating the central mirror mount
- 1/4 in. steel or aluminum rod (NOTE: The 1/4 in. aluminum rod I could find locally was actually larger in diameter than 1/4 in. and not compatible with my Tap & Die set so I ended up using steel rod)
- 1 Button Head machine screws (hex head) #10-32 x 3/4 in.
- 1 #10 Fiber Washers
- 2 #10 Rubber Washers 1/4 in x 5/8 in.
- 1 #10-32 nut
- 1 #10 lock washer
- 1 #10-32 cap nuts
- 2 1/4 in.-20 Flange nuts
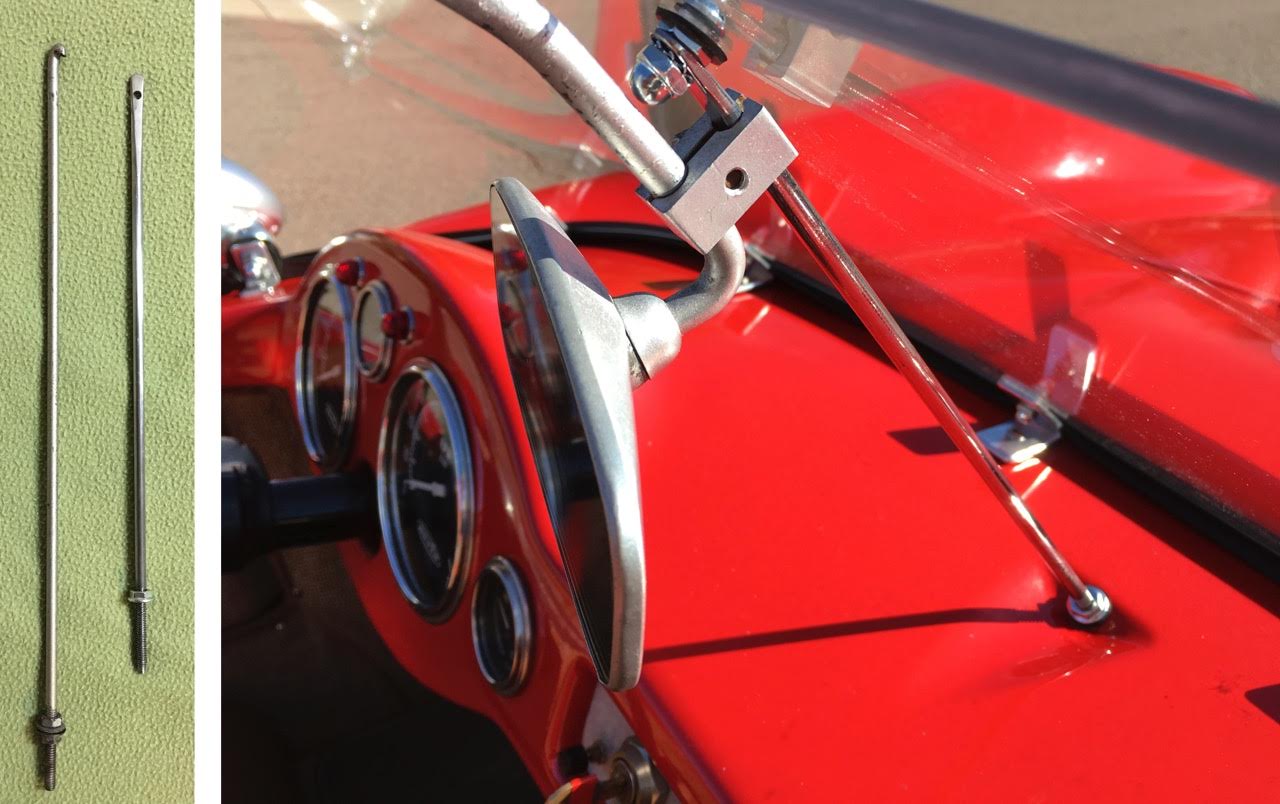
The original Devin windshield uses a speedster style rear view mirror and mirror positioning rod attached to the windshield frame and the fiberglass body. I wanted to retain my rear view mirror and maintain the original look if possible. I used my tap and die set to cut the same 1/4 in.-20 size threads into my rod as the original Devin rod. Then I test fitted it to the dash to get and approximate height and cut the rod with a cutting disc on the rotary tool. I used a torch to heat the top of the rod to glowing red hot and used a small sledge hammer against the mini anvil on my vise to beat out a wide and flat area. Then I drilled a 1/4 in. hole approx 1/8 in. from the top of the rod. Like the mounting brackets I used the bench grinder, dremel tool, wet sander, and buffing discs to finish this piece.
Lastly I used the special acrylic drill bits to drill the hole in the top-center of the windshield 3/4 in. from the outer edge. I added the #10-32 nut between the windshield and the rod as a spacer to ensure the rod or mirror mounting bracket would not rub or scratch the windshield. The steel rod should be secure but need not be overly tight.
When mounting the mirror bracket be careful to hold the mirror in such a way as the force applied when tightening the clip is offset by your hand and not pushed through the steel rod into the windshield. This will help avoid undue stress on the windshield and the mounting rod. Be careful not to crack the windshield.
If you need a rear view mirror for your Devin C the original style is VW part no. 211857511A. The VW mounting bracket must be trimmed with a cutting disc or saw. An alternative option would be to use a reproduction of the Porsche Speedster mirror. Porsche used a similar central mounting rod and the Speedster mirror mounts to the Devin rod easily with no trimming required. Reproductions of the Speedster mirror that include the mounting clip can be found online for about the same price as the VW mirror. Either will improve the looks and safety of your Devin for about thirty-five bucks.
Part 5: Final Results
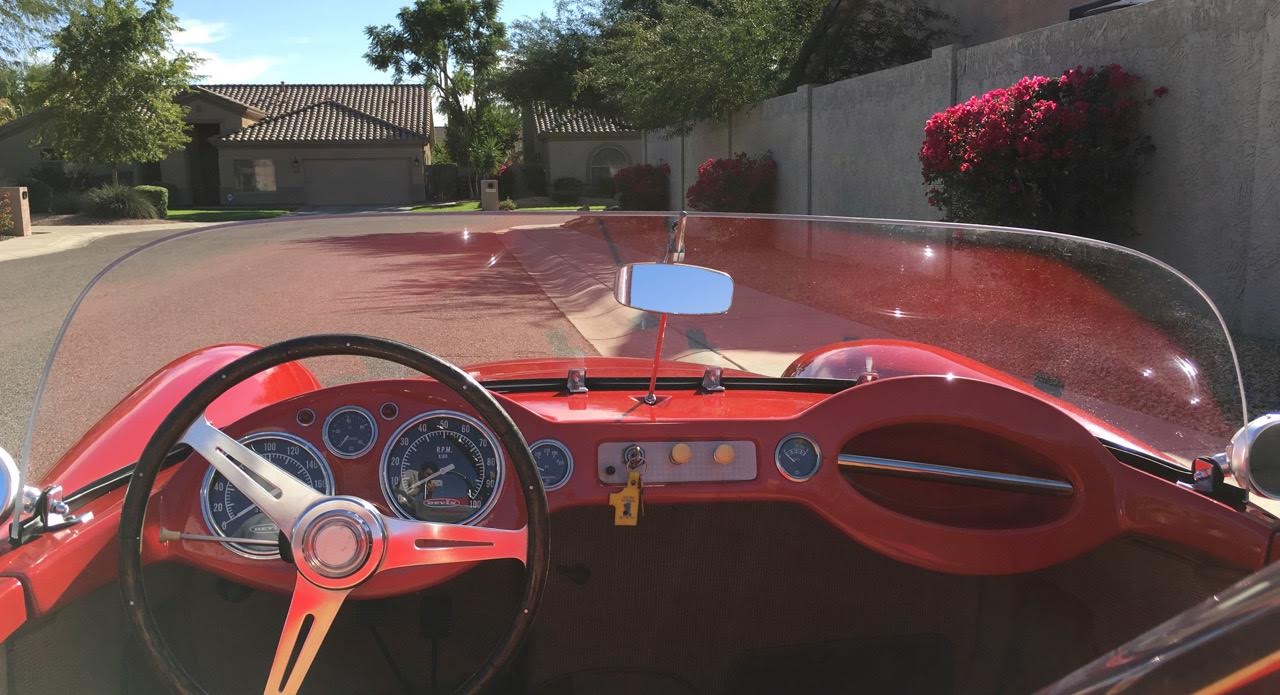
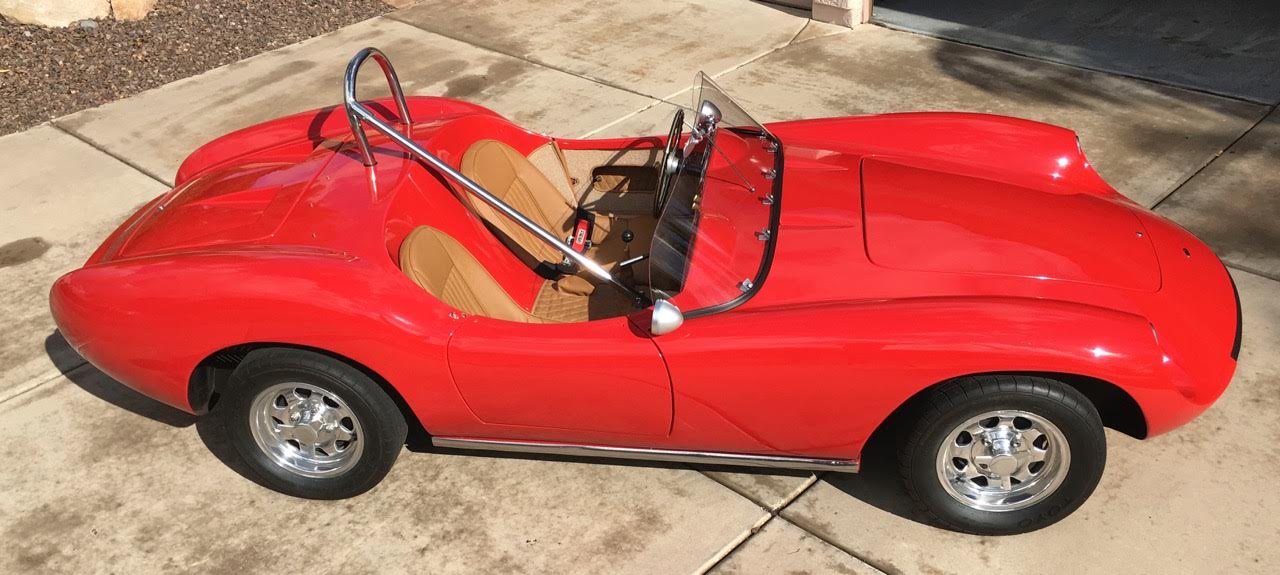
I’m really pleased with the quality and fit of this new windshield and how it looks on the car. The addition of the side mirrors increases rear visibility too.
Care and feeding
Use only PLEXUS brand cleaner and a clean soft cloth to clean the acrylic windshield. Never use paper towels.
If you choose to retain you windshield wipers be aware the blades must be clean of any debris before use as even a grain of sand can scratch the acrylic surface. If you do scratch the surface use NOVUS plastic & acrylic polish to buff away minor scratches or hazing. With proper care the acrylic windscreen should provide a lifetime of use.
Now that I’ve installed the prototype windshield what would I do differently in the future?
If I were to do this project again (or if I ever repaint my car) I would not be concerned with reusing the stock holes in the body. Utilizing those holes added a lot of time and effort to the project that would not be needed otherwise. That said, I’m thrilled with how the speedster style windshield looks on the Devin. I was honored by the opportunity to work with the great people at Aircraft Windshield Company and teach myself a few basic metal fabricating skills in the process.
Does it work?
I’ve logged a few miles and I am really enjoying the Devin with this new speedster style windshield. The airflow is smooth, while the height and shape flatter the curvaceous lines of the Devin body. If your original glass is delaminated or broken it’s great to know Aircraft Windshield Company now offers new replacements. If you want the racier look go for the speedster style windshield or work with their craftspeople to design the perfect windshield tailor made for your Devin!
